
          
|
Kit Review: Trumpeter 1/32nd Scale F-100D with Avionix Cockpit SetBy Floyd S. Werner Jr. The History
Why build this model? I'm certainly not known for building jet aircraft so why this one? Well to tell you the truth it wasn't my idea, it was Rafe Morrissey's. Rafe, along with Dave Powell, and I are the various parts of Master Class Model Building Videos. Rafe is the producer and associate director. Dave is the videographer and editor. He makes me look like I know what I'm doing. Not an easy feat. Of course I'm the modeler you get to see on the screen and listen to. You are listening right? It helps that we are all modelers so we have a synergistic effect on each other. That is why it takes us almost a year to film and edit these videos.
The Kit What do you get in the sturdy box? There are a bazillion parts in the box. OK so not a bazillion but a whole bunch of big parts. There is a sprue of the clear parts that are realistically thin. A "fret" of rubber parts is included that has the tires. A fret of photo etch is included that has the segments of the engine turbine section. A set of white metal landing gear is included. The instructions are included in a very nice booklet. The decals looked a little suspect but useable. The plastic is molded in light grey with rivets everywhere. My opinion on this scale is bring them on. I liked them and thought they added to the look especially after weathering. The Avionix Cockpit
The cockpit fits perfectly into the fuselage halves. I'm not going to write a whole lot here as you can see the
cockpit installation on the DVD. The Eduard Big Ed Set One thing that I did want to do was use some photo etch. The Eduard Big Ed set is a very complete package and covers everything from the cockpit to the placards in the wheel well. I've reviewed the sets for IPMS/USA at http://www.ipmsusa2.org/Reviews/Details/Aircraft/eduard_32/eduard_32_f100d-biged.htm. Unfortunately, because of time constraints I could not use every set but the parts I did use fit perfectly. The one thing that I really did like was the self adhesive pre-painted instrument panel. Why use this when the Avionix has a perfectly good instrument panel? Well that is explained in the DVD. OK it has something to do with the limitations and benefits of the two mediums and how they compliment each other. The Engine Construction actually starts on the engine. The first part to get right is the intake. This is a pain to get a nice fit and seamless intake. I did my best but unfortunately it isn't as good as I would have liked. Sure enough once I was done with the model an aftermarket intake cover came out. Ain't that the way it always is? The engine itself is pretty representative of the real thing. If you are not going to show the back of the airplane open then I'll let you in on a little secret. Don't add the photo etch turbine blades. You can't see them. Also don't fill the back of the intake again because it is invisible. You don't even have to paint the engine outside. I painted the exhaust with Model Master Magnesium. The afterburner is the only part that you will need to fill. The Eduard set will add some to the afterburner. The Fuselage
While that was drying it was time to make up the aft fuselage section. There are bulkheads that you will have to fit in there. Be careful which section you use as one is for the exposed engine and one is for the closed one. Fitting the front to the rear fuselage as not as bad as I thought it would be. The fit was near perfect. I did glue one side at a time and let it dry before doing the other side. This ensured that the fit was perfect. Adding the nose weight was easy enough but the fit of the front panel was the worst fitting panel on the model. I ended up having to fill with some super glue and then re-rivet it. Thank God Rosie the Riveter comes in the proper size. I added the ammo chute covers and the other small panels. They all fit relatively well without much fuss. Some of the covers did need just a bit of filler around them, but nothing that was beyond a "normal" modeler. The Wings
Once the wings were attached the landing gear was built up as per the instructions. I used the plastic ones as I thought they were crisper than the white metal ones. Painting Silver lacquer is the way to go on this baby. That made life easier. To replicate the silver lacquer I primed the model with Alclad Grey Primer and Microfiller. After fixing some small mistakes it was real easy, just use Alclad Aluminum. I painted the whole model this way, everything. Now the burner can needed some work. I masked off the red warning stripes and painted them Model Master Insignia Red. Then I masked off the burner can. Why the can? Well to replicate the silver lacquer I had a plan. I gloss coated everything but the can. This was done so I could decal the aircraft. Eagle Strike Decals
After the decals set up, the model was given a flat coat over everything but the can. This ensured that the can looked metallic but the silver lacquer was just created with the flat coat. It looks realistic to me. Weathering The weathering was started with a wash of burnt umber. The umber gave it a nice dirty look. A slight graying of the decals was achieved by a very thinned grey paint. I then added some heavily thinned Tamiya Buff and sprayed it from the front to the back on the wings. This imparted a "feel" of movement across the surface. The fuselage got the same treatment but the orientation was top to bottom. Burner Can- How did he do that?
Final Touches Once the burner can was done it was time to add the rear horizontal tail planes. The tail hook, canopy and the exhaust nozzle brought this to model to an end. I was happy with the results, especially since it was my first jet since I've been building "serious" models. Conclusion The fit of the kit is very good. The only issue I had was the access panel on the nose and even that was not that big a deal. The model looks every bit a Super Sabre. The Avionix cockpit fit is superior and leaps and bounds better than the kit's offering. The seat alone is impressive. The Eduard Big Ed set is impressive in its offering. There is just a lot of photo etch there. You will need a lot of patience but because of time constraints I couldn't use as much as I wanted to. The Eagle Strike decals are a colorful addition and address the weakest part of the Trumpeter kit, the decals. Of course some of you will wonder if the kit is worth the cost ($179.95). In my opinion it is a little overpriced, however, it is the only game in town. There are a lot of components that you either don't see or don't use. This all adds to the cost. Is the $185 dollars in aftermarket necessary? I felt that the aftermarket stuff was great. They all add a lot to the finished model. You will have to be careful though as they sometimes overlap. Bottom line I really enjoyed this model and it has a prominent place in my display case. That may be because it is the biggest thing I've ever built. Highly Recommended with reservation. Shameless Promotion - If you like what you see with the model the techniques I used are featured in the original Master Class Model Building Video. The Alclad paint techniques are the highlight of the first Clinic. The advanced techniques featuring Resin, Photo Etch and Vacuform canopies are the subject of Clinic #2. This model is a culmination of the three DVDs. I like the results. If you want to see how I do this model feel free to check out our website: http://www.masterclassmodels.com/. References: All are available through Squadron/Signal Publications at http://www.squadron.com/.
Aftermarket Used: (All Highly Recommended)
|
© Copyright 2010, Austin Scale Modelers Society (ASMS)
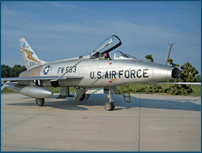 Let me be honest, I don't know squat about the history of this airplane. There I said it. It is a cool looking
airplane, what more do you need to know? OK it flew in Vietnam and performed many of the early fighter bomber
missions, including operating as misty FAC. It was the first to fly supersonic in straight and level flight. With that
said let me recommend this website as it contains everything you will need to build this model:
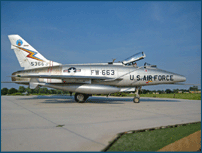 When we wanted to build something different for our new DVD we decided early on to use the F-100. It was a
new kit and there would be some good stuff to use. Besides being new it was huge and that means easy to
photograph. Since we were going to be doing Resin, Photo Etch and Vacuform Canopies using the Avionix
cockpit seemed like a no brainer. So it was decided to use it for the video and it was time to start filming.
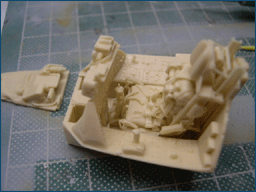 The Avionix cockpit was one of the reasons we decided to use this airplane for the video. The resin set is made
up of caramel colored and blemish free. The quality of the casting is exceptional. You will have to make a
decision. If you want to use this set you will have to sacrifice the ammo feed shoots behind the cockpit. Why is that?
Well, Trumpeter made an engineering concession. The kit cockpit is flat across the back and front to allow you to
show the ammo feed chutes. Avionix will not let that happen. Their cockpit is like the real thing. This means that it
intrudes into this compartment. I didn't think this was a big deal.
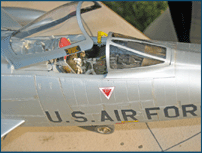 The ejection seat looks great. It fits the tub perfectly and I don't even remember gluing mine in.
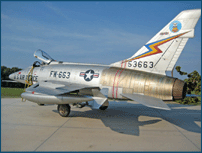 With the engine and intake trunking assembled and painted they are inserted into the fuselage half. The Avionix
cockpit fits perfectly if you followed the instructions and the DVD. The front fuselage halves are joined up and you'll
find the fit is actually perfect. Fairing the intake into the fuselage halves did require a little bit of work, but nothing too
difficult.
 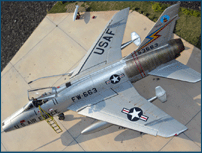 The wings feature very nice detail. They fit together perfectly. One thing that I noticed was that the attachment
points are actually pretty small. I filled the holes for the armament under the wings with styrene. I only wanted to have
drop tanks on my model. Getting the flaps and slats were really no problem. The flaps are able to be drooped if
you want but I built mine up. You will need to assemble the flaps as per the instructions. The flaps get sandwiched
PRIOR to assembling the wings and not assembled separately.
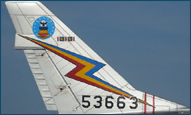 The decals worked just as advertised. A little setting solution and everything snuggled down properly. The
decals were opaque and very thin. They added the color and life to the model.
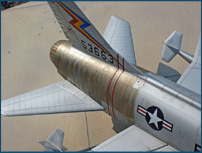 The burner can represented a special challenge with the burn effect. I achieved mine by removing the masks
and masking the "dull" sections. Then a light coat of Model Master Burnt Metal was sprayed to change the color
slightly. Alclad Metal Sepia was thinned this with Alclad Transparent Medium. Then vertical strokes were sprayed
with my Iwata airbrush on the very inside of the panel lines. This was built up slowly. Once I was happy with it. I
used Alclad Transparent Red next. It was also thinned this with the Transparent Medium. Vertical lines were
used to box in the Metal Sepia. These were used to vary the tone of the next hotter section. The Alclad Transparent
Blue was heavily thinned to and sprayed next to the red. The blue would create the "hottest" areas. I was happy
with the results but I thought it could use a little bit more umpf. I used thinned Tamiya clear yellow and orange and
sprayed them over the upper surface in a mottled pattern.